After you have successfully setup your reporting application, building your first report is pretty simple.
When you navigate to your ASP Report Wizard page, you would see a listing of your tables & views similar to the screen shot below.

Clicking on any of the table names or views will automatically generate a report for that table or view containing all the fields as seen on the image below.

We are basically going hour to build the report generated above into a meaningfull drilled down report as seen in the image below.

We would begin by selecting only the fields we want to display.
To remove
some of the fields, check the next section of this tutorial Selecting fields
to display
To specify the fields to display, you would have to use the report wizard.
Click on the Build Report link at the top of your report. This should pop-up your report wizard form displaying all the fields available as seen below.

Select the fields you want to display by checking the check boxes next to the field names.
Click Finish to reload your report showing only the selected fields, or click Next » to add captions to your field names.
Launch the report wizard as by clicking on the Build Report link. This should come up with your previously selected fields already checked.
Navigate to the section for adding captions to field names. It should look like in the image below.

Enter the column captions you want for your fields, select the data output format from the drop-down listbox and click Finish to reload your report showing your new column captions and your data formatted as selected. Click Next » to add filters (seach conditions) to your report.
Launch the report wizard a and navigate to the section for adding filters. It should look like in the image below.

Select a field to filter, select the filtering condition from the drop-down box and enter the value to filter the records by.
Select the AND option to do an inclusive search or the OR option for an exclusive filter.
Click Finish to reload your report applying you new filter, or click Add Filter to add another filtering condition or click Next » to
add a title, description, password display format etc... to your report.
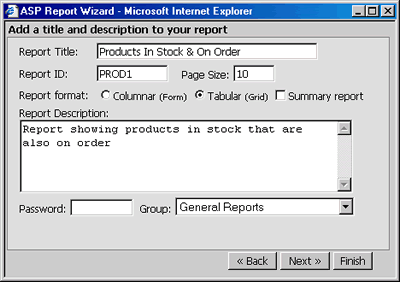
Launch the report wizard a and navigate to the section for adding the report's description. It should look like in the image below.

Enter a report's title, description and the default page size of your choice. Change the report's ID if you wish but remember that reports are identified by the report ID, so using an already existing report ID will overwrite the existing report. Click Finish to reload your report applying the new changes or click Next » to add field summaries to your report.
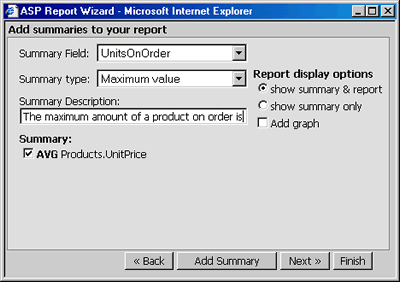
Launch the report wizard a and navigate to the section for adding field summaries. It should look like in the image below.

Select a field to summarize, select the summary type from the drop-down box and enter the description for the field summary. Click Finish to reload your report applying the new changes or click Add Summary to add another field summary or click Next » to reorder the report's fields in the order in which you want them to appear.
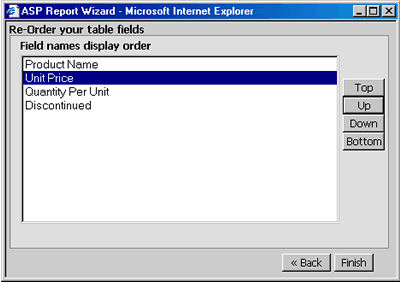
Launch the report wizard a and navigate to the section for reordering the report's fields. It should look like in the image below.

Reorder your field names as you wish and click on Finish to reload your report applying the new changes or click Back to edit other report information.